In addition to being a Craig's list fan, I also enjoy Realtor.com. I plug in a zip code for an area that I like and cruise around imagining myself living in various properties. I usually cruise low to high in the price range, and then, happily keep upping my budget. Well, what would a million get me? When you plug in Malibu, CA as your search location, it's not hard to start meandering into the multi-million-dollar house price zone. And that's where I happened upon this little gem on PCH, which was recently sold for about $7 million (it's right on the beach). I kept all of the images on my desktop because I loved the French style of this house and planned to use it as a model. There are some great details here, including the stained arched doors, flag stone patio and salmon-toned stucco. But what I really love is the barrel roof tile treatment. Looks like the edge treatment is about three layers thick. The funny thing about this house is that a few weeks after noticing it on Realtor.com, I kept seeing it pop up in various places. The first time was while visiting ROC design (http://www.rocdesigninc.com/home.html), owned by architectural designer and general contractor Dominique Rocoffort de Vinniere. Dominique's office is right by my house—across from our Whole Foods Market—and my husband and I can't resist stopping in there from time to time to look at the beautiful windows, doors and shutters on display in his showroom. We purchased some African mahogany French doors and rustic closet doors that had been sitting in his office for a year at least (and were nicely discounted.) On this trip, Dominique was graciously showing us some of his design work via his computer and voila—one of his pics was the same one from Realtor.com. Turns out, he designed my Malibu dream house. He also revealed the secret of how to create the three-layer thick clay tile edging. Apparently, in France, the wealth of an owner was represented in how many rows thick the roof tiles were layered. I don't need to be quite so ostentatious in my roof design, but I do love the look of several rows! We're working on our roof now—so here are a few pics to give you an update of how far we've come. You may notice some similarity to the dream house, but it's subtle.
 |
| Here's the Malibu Dream House. I happened upon it at Realtor.com and fell in love. Right on the beach, it recently sold for $7 million. |
 |
| Ah, do you see a little bit of the dream house vision here? You may have to squint. In this pic, we hadn't yet started the roof yet. Nor, put up the black builder's paper. |
 |
| Here's a closer look at where the two parts of the house meet at the roof. I was seeing a little bit of similarity to the Dream House with this joining. |
 |
| Here, the tiles are starting to be placed on the roof line. Notice the clay pieces at the end of each tile. They're called bird stops. The clay S tiles, which are made by Boral/U.S. Tile, are pretty eco-friendly. They are cool-roof rated, 100% recyclable and are made from 59% recyclable materials. We went with Corona del oro and merlot, but we've been adding a "slurry" of cement mixed with stucco pigment to get some of the sage, white and gray tones mixed in with the terra cotta and merlot tones. I've noticed a nice patina to Provence-style roofs, so we had to create ours from scratch. (Notice the Malibu Dream House has tiles that are likely reclaimed barrel tiles shipped from France. They have a stronger arched barrel shape than the "S" tile.) Our unconventional roof tile color selection has not gone unnoticed from our neighbors, who have called it "colorful." I think that's a good thing. But, not sure yet. |
 |
| More of the tiles going up. |
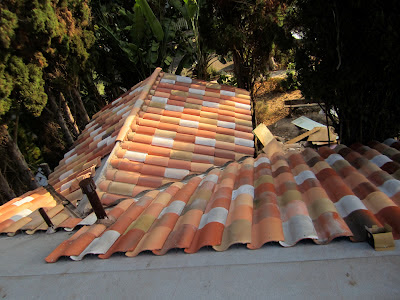 |
| A view from the roof looking down toward the street. Yes, it is colorful. We think after the first rain, some of the pigment will wash off, so we're not exactly sure what how the final patina will look. |
 |
| This is a close up of the ridge prior to the ridge tiles going on. The cement is terra cotta colored, but gets lighter when it dries. The metal gully there is where the rain should drain out. I had no idea how complex this process was until watching our crew go to work. It's especially tricky to place the tiles around the sky lites, of which we have nine. If it's not done properly, your sky lites will leak. |
 |
| This view just shows the west side of the roof still to be finished. The shingled roof shown in the background is the garage. It will have to be covered in tile as well. |
 |
| The other place I happened upon "My Malibu Dream House" was on one of my favorite blogs called "Velvet and Linen" by Brooke Gianetti. It was one of her posts in which she was showing the interior decorating work of Ann Barron. The best part: Brooke showed some great close-up shots of the inside of the renovated malibu beach house that I originally saw on realtor.com. It's tres beautiful! If you want to check out more pics, click here: http://brookegiannetti.typepad.com/velvet_and_linen/2011/06/a-giannetti-home-project.html?cid=6a00e554d7b827883301538f376885970b |


Your dream house is breathtaking; it is no wonder you fell in love with it! Nice choice for roofing tiles, by the way. It is colorful, durable, and has a long service life with low maintenance requirements. Cool, right! It's been months now, how's your house progressing so far? >Brook<
ReplyDeleteA bit of shame that Malibu house got bought or that someone got to it first. But that is how it is. At least this shows you that these kinds of houses can be found in Malibu to begin with: classy and luxurious without the multimillion price tag that is usually the case with mansions in that area.
ReplyDeleteHayden Farley @ Malibu Real Estate Agents