Wednesday, January 30, 2013

The Kids' Bathroom: Inspiration Takes Shape


Here's a look at the closet from my daughter's old bedroom. We added that window and then, ripped out everything else. This space will basically be converted into the new water closet. We extended the house behind those shelves--and that's where the shower/tub area will be. To the left of this closet was the old laundry area. This has become the new kid's bathroom. We had planned to create a new floor out of polished concrete, but as luck would have it, we had some extra terra cotta pavers left over from the kitchen and sunroom tiling. We even eked out a few more for the water closet. It's a more grownup look for a kids' bathroom, but we'll keep the elements organic with white plaster and rustic, earthy materials, which also means indestructible. With our swimming pool, we tend to have a lot of play dates at our house and that means a lot of wet towels, feet and bathing suits. So, our kids' bathroom has to be tough. In fact, our backyard pool and jacuzzi played a large part in how we designed this bathroom. It's right off the back steps to allow traffic straight from the jacuzzi to the bathroom (and vice versa). We also needed ample space for this bathroom because it's essentially a bathroom inside of a bathroom and will be used by multiple kids at one time. So for us, the toilet area had to be private so that the rest of the bathroom could be used or left open as a thoroughfare to the rest of the house. The shower/concrete bath tub area, which has a partial wall, is also private with hooks inside for a robe. We also opted for a towel warmer because we use our jacuzzi year-round and a warm towel is the only way to muster the courage to get out of the jacuzzi on cold winter nights!

The Inspiration

In order to finalize our design for the kids' bathroom, I looked at quite a few bathroom images on line. Here are a few pics from my inspiration file. I found that I kept returning to earthy clean bathrooms with elements of concrete, stone, wood and plaster. 
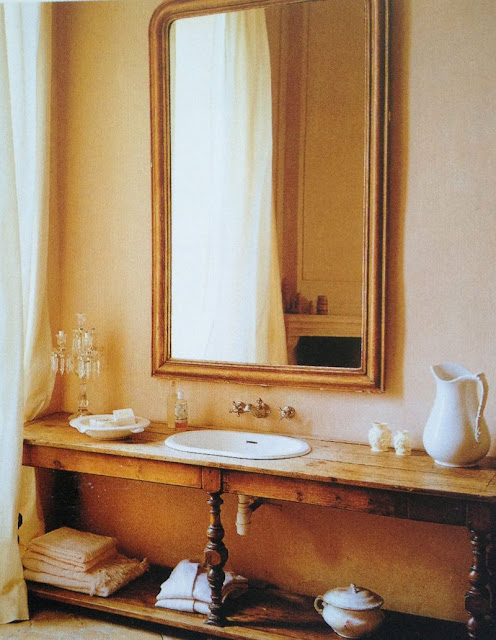
I love the look of the wood vanity here with the porcelain vessel sink. So pretty. Vessel sinks do have their drawbacks though. Not as easy to clean as the undermount sinks. And they seem to take up more counter space.
This is a great bathroom. Again, a nice combo of vessel sinks with a wooden vanity that looks to be a refurbished table. This gave me the idea to split our farmhouse table in half and use it as our vanity. (The other half will become the desk top for my daughter's new room.) I would have loved to keep this farmhouse table for our dining room, but it's long and rectangular and would compete with the wood island of the same size. Too much bulky furniture filling up our open floor plan.
Another nice wooden vanity. This time with a rectangular sink. I also like the wall mounted fixtures.
Wow. This vanity looks like art. Beautiful. But, doesn't look like kids live here.

This is one of my all-time favorite bathrooms. Those concrete floors look super tough and easy to clean. I also love the stone wall and towel warmer.


Here is another great example of what you can do with concrete. Love this bath tub and the vanity with the sinks dropped right in. 

I love the French doors here and another partial wall partitioning the shower area.  Very clean.

Love the juxtaposition of the concrete with the crystal. We'll have a chandelier in the kids' bathroom, too. Maybe a little grownup for our kids--but I have to have it.

This is where I got the idea to do pavers in the bathroom. I love the rustic look of this bathroom. And the built-in closet made with a reclaimed door looks great. Don't think we have room for that chaise lounge though. Too bad.

Another beautiful bathroom with a sink that's so sculptural. I wouldn't mind this as my master bathroom, but it doesn't have a kid-friendly vibe at all.

The image to the right looks so bright and light. Nice concrete countertop. And again, terra cotta tile floor. This is a vacation home in France that is available for rent. I guess I just love the feeling of being on vacation and that is just what this bathroom evokes for me.

Again, clean, modern. Nice built in cabinetry. How easy would it be to make that vanity from concrete with a shelf below for bath essentials and/or towels? That ladder makes a stylish towel rack.

I love this bathroom. It just feels like you're on vacation in France in this bathroom. Rustic, yet functional. Are those waste baskets down below? Or laundry baskets? Not sure, but I love those, too.


Here's a view of my daughter's old bedroom. Her door entered into the old kitchen/service porch/laundry area, which was not that practical and pretty cramped.  We blew out that back door and extended the back of the house to accommodate our bigger bathroom. We also added pocket French doors to lead into the new bathroom from what will now be my son's bedroom.

Now, you can see the walls removed and the new pocket doors that will lead into the kids' new bathroom. There are French doors just beyond these that lead to the backyard and a stone walkway leading to the pool and jacuzzi. The area just inside these pocket doors and to the right is the new water closet. Behind that is the shower/tub area. Inside these doors and to the left is the dual sink vanity area.

This is a view of the new shower/tub area. There's that partial wall. We also added a nice tall beam reclaimed from the old attic of our house. 

This is a view of the old closet now framed into the water closet. We're missing a ceiling here, too. That has been added, of course. And this room is now tiled with the pavers.

Here's a sketch of the south wall of the kids' bathroom. That's our old dining room table split down the middle. I just ordered those rectangular sinks from overstock.com. And that round window at the top is reclaimed from the front of our house. It wasn't to code for use in an exterior wall, but it works nicely here on this interior wall, which is shared with the new kitchen. It only lets light through. You can't actually see through it. The chandelier will hang centered to this round window, so you may be able to see the glow when you're in the kitchen.

Another overstock.com purchase. I love the dual flush system and modern design. It should be easy to clean around the base of this toilet. 

Very budget-friendly rectangular sinks. I did find a cool trough sink on Craig's list, but it was still more expensive than two of these ceramic sinks on overstock.com.

We chose this faucet because it's nice and modern and doesn't require you use two hands to adjust your water temperature. Should be easier for the kids. The spout height also seemed to work perfectly with the sinks we selected. We could have gone with a faucet that was mounted behind the vessel, but we were afraid we'd have too much water splashing behind the sink all the time.

A hard-wired towel warmer. This will go on the partial shower wall. I know we could have lived without this--it was a budget-friendly splurge. But, I will make good use of this.

Stay tuned. I'll post pics soon as the bathroom pieces are installed. The plumber is putting in sewage pipes this week. And the toilet just arrived today!

Friday, January 18, 2013

I'm Floored: The Terra Cotta Tiles Are Going In!

Today, the reclaimed French pavers that we've had sitting outside under a tarp (for two years) are finally going in! Yeah! I can't tell you how excited I am. Our terra cotta pavers are century-old pavers, reclaimed and shipped from France—at least that's what the guy from Craig's List told us. I had my eye on this style of paver for some time, but the best price we could find in Los Angeles was around $18 per square foot and that was not in our budget. During one of my random searches on Craig's list, I found these beautiful little creatures at less than a third of the price. It was a huge stroke of luck because I'd never seen French pavers on Craig's list before, nor have I seen them appear again. 

With colors of moss, amber and bordeaux, this terra cotta tile (called Chateau Parefeuille) is wondrously timeless. In 100 years, they'll still look good. If floor tiles were food, these would likely be scones or croissants or an earthy rosemary baguette. My thinking: If these tiles lasted a few centuries already, I don't expect our dogs can do them much harm. And when the sun hits them through the sky lights—watch them cast a golden glow—just like the crust of a fire-grilled pizza. Getting hungry just thinking about it. : )

A discussion of terra cotta tiles would not be complete without a few examples from actual Provence vacation homes. Here's a nice one installed at an angle. They look wonderful next to fresh white walls and light colored cabinetry.

Here's a sample of tiles laid in another traditional tile pattern: We opted for this pattern in our kitchen. But running against (not in the same direction as) the longest distance of the room. 

This image is from Bramasole, the actual villa used in the movie "Under the Tuscan Sun," one of my inspiration houses. It's another traditional way to lay the floor. We started with this version, but opted for the more simplistic version shown above because with less angles, it would require less tile and we might eek out enough surplus to tile the sunroom and bathroom, too.

Another pretty kitchen floor!

These tiles look to be quite large and square. Pretty, but I still prefer the more rectangular shapes.

Another Provence kitchen. Rustic, yet timeless. 

This living room is located somewhere in Santa Barbara, Calif. There appears to be a lot of brown tones in the clay used to make these tiles.

Here's a shot of our tiles stacked in the backyard. Can't wait to clean up this pile and have some room for the kids to play!

Here is a shot of our kitchen with our new stone wall installed. We had to demolish the old kitchen right down to the original floor boards. The pieces of metal, of course, are where we had to patch up holes in the old wood planks. As a completely irrelevant aside, that little square cut-out on the wall will be a little secret wall niche for teas or a cell phone charging station. Right now, my daughter uses it to take imaginary ice cream cone orders. I'll have a twist with sprinkles, please.

Here's a shot of the underlay paper and the Wonderboard as it was going being installed. The entire floor was covered with these hardi-backer boards (they are screwed in) and then the seams were taped and sprayed with adhesive. 

A shot of our tiles at the onset of the job. We chose a band of 6.5" square tiles because we had a surplus of those. They will create the border for the 8" x 14" rectangular tiles. The traditional way of laying these tiles entails a very small grout line, hence ours are pretty tight. Because the grout lines are so small, we must go with a sandless grout. We chose the quartz color: an oyster-shell hue, a shade or two lighter than their "Dorian gray."

The kitchen is almost halfway tiled at this point--awaiting grouting, of course. with the afternoon sun streaming through the back door, I already want to take my shoes off and walk barefoot across it! Our crew will finish the placement on Monday and then, we'll determine if we'll go with the traditional boiled linseed oil and antique beeswax finish or a more modern chemical finish and sealant. From what I've read, using the linseed oil and beeswax makes your house smell wonderful, but you do have to do regular maintenance with the beeswax to maintain the tiles. I've also heard that linseed can change the color of the tiles--sometimes bringing out more red tones, which is not what I want, so we'll have to experiment first before committing to this method. I will be sure to report back on our progress with new pics!

Friday, January 11, 2013

Pools of Reflection: An Essay on Patience (Sort of)


Pools of Reflection
Originally written September 10, 2010

“Is the pool done?”
This has been a question asked by well-meaning friends for nearly six, maybe seven years now. Perhaps longer. We lost count somewhere after 2003. I could go back and check my receipts, but such a task would be far too daunting—not to mention demoralizing. Does it take six—or argh—seven years to renovate a pool? How could it? People build an entire house in less time? A concert hall. The freakin space shuttle.
“But what you don’t realize is that it wasn’t just the pool,” says my well-meaning husband, a cross between Indiana Jones, Dr. Who, Rain Man and Oscar the Grouch.
“You forgot that we also renovated the guest house, the garage, built a shed, buried the power lines, installed drainage pipes, new gas lines…blah, blah, blah.” After he recites the fifth or sixth item on his list, I’ve already tuned out.
Being the stay-at-home half of our union, he was always the natural candidate-elect for house repairs. Not that I could have gone out and hired someone else to do it anyway. He would have found a million reasons why no one else could have done the job, but him. And he did.
Since he’s an engineer (read: automotive), I thought he could handle the job. But engineers are cut from a crafty, if not bull-headed, cloth. And three or four years into the project, I’ll admit I started to have my doubts. At first we joked that he wasn’t renovating a pool, he was building a teleportation device. And after his regular phone calls and email correspondence with NASA scientists about the pool—I did start to wonder. (More on our state-of-the-art, eco-friendly, no-chlorine filtration system in a future post.)
The crap really hit the fan after our daughter Zjena (pronounced Shenna) was born. My husband promised that the pool would be finished for my maternity leave. Along with my visualizations that my labor would be easy and over in under an hour (read: It wasn’t by a long shot), I had put a lot of visualization juice into imagining myself with our new baby poolside June through August 2006, which was my planned leave from work. Nursing by the pool. Staying hydrated by the pool. Working on my screenplay while the baby slept by the pool. Yes—I attached great emotion of joy to all of these images. So, if someone would consider that I just didn’t visualize strongly enough: well, I beg to differ. Which led me to believe there was some other element at work. An unconscious negative thought form perhaps. Mercury in retrograde? Or worse, bad karma. It was probably the latter.
By 2007, the pool started to become a big sticking point. It was inevitably the focal point of most arguments. No matter how an argument was started, it could always be obfuscated or escalated by my throwing the pool—and the small point about its lack of being finished—into the mix. It was like gasoline. Poof. My mom’s phone calls when she would ask if the pool would be finished by the time she came out to visit next—no, it wasn’t—didn’t help either.
Really there was no shortage of reasons why it was taking so god awful long. There were so many good reasons. Many days, our trade people just didn’t show up. They would say they were coming. Then, they wouldn’t show. Car trouble, family deaths, unexpected hospital stays, and a slurry of unidentified personal emergencies were the sundry assortment of reasons. And each one had their quirks, which we tended to overlook because our budget did not allow for less quirky hired help. One didn’t speak any English. One sang Mexican opera whenever he worked. And one brought his familial entourage, namely his sister, her boyfriend and their two kids—a toddler and baby. And sometimes the trade people would make mistakes. Like the time they installed the flagstone around the pool higher than the bottom of the French doors on the guesthouse next to the pool, which meant the doors could never be opened.
“No problem,” the one guy said. “We can just cut a few inches off the bottom of the doors.”
“But wouldn’t that create a huge gap under the doors?” I asked.
They scratched their heads and looked at each other grimly. 
Then, there was the department of Building and Safety. Don’t get me started. Suffice it to say, the only reason our Jacuzzi was finally approved was because one of the inspectors had a bad case of gas, diarrhea and/or intestinal flu. He signed off on our Jacuzzi (which my husband designed, dug out and constructed mostly by himself) because he just had to get out of there—and fast. It’s that simple.
And, then there’s the pool slide, of course. Since we were converting our old 1970s blue liner pool to a stone pool (my bright idea), we also had to remove the old fiberglass slide and replace it with a cement slide (my bright idea again) because that would look more natural. As if a cement slide is natural. Add to this the feng shui lady, the one who “feng shuid” The Grove, a shi shi mall in Los Angeles—a consultant I had interviewed for my work at the magazine, and so, she gave me a discounted hourly rate—who insisted that we had to twist the slide so that the water would always run toward the house, not away from it. Water running away was apparently not something you want in the wealth corner of your property! So, what we ended up with was a 20 foot twisting monstrosity that resembles a cross between the Matterhorn and Splash Mountain, which is likely a big insurance payoff waiting to happen. But luckily, most kids will be too terrified to slide down it anyway.
While I can report that the pool is now finished (permit and all), I did learn a few things from that big stupid hole in the ground. Some surprising things. One of which was taught by my very own daughter, who is now four.
All through the pool construction, she was never daunted as I was. She never once complained or worried what our houseguests would think about its sorry state. To her it was always perfect, which is to say she fully enjoyed the pool when it was empty and an eyesore. At one point, it held her sand box and several blow-up kiddie pools. She rode her skateboard around it. And she could busy herself for a good half hour by tying her jump rope to the stairs in the deep end, and using it to hike out like a mountain climber. We also discovered that if you worked up enough speed you could run around the inclined walls, defying gravity. When her father and I would run in separate directions we looked a lot like those circus acts with the motorcycles in the cage. And when the winter rains came to LA, she would take her dad’s hand and go swimming in it. Frolicking in the dirty water like a joy-filled chimney sweep. Sometimes I wonder if it was all her energy—the happy high-octane stuff—that got the pool finished after all. To her, the pool was already finished. It was always perfect. And now that it’s filled with water, it’s a new adventure, but not necessarily better or more fun than it was when it was empty.


More Before and After on the Pool and Backyard: A Reminder That Mess Eventually Equals Progress

Before and After on the Pool


Before and After of the Guesthouse Outdoor Kitchen Area

This stainless-steel outdoor kitchen (made in America by the way--Torrance, Calif.) has been a godsend now that the kitchen in the main house is completely under construction. The side burner handles everything from soup to noodles. We even bake cookies on the BBQ.

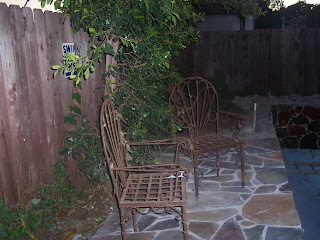
Before and After of the new pool slide. We added a lot of trees on the South side to give us privacy. All we had originally was this five foot wooden fence. Just beyond these chairs is where the slide was ultimately placed.

You can see all of those trees here. They were five foot trees when we planted the row of them, but they shot right up in no time and create a wall of privacy that does need to be trimmed from time to time to ensure we get full sunlight on the pool and not too much shade.

Before and After of the backyard area. Notice all of that dirt to the right. That was what was dug out to create the hole for the new jacuzzi. Talk about a lot of work--and my husband (see pic) gets the credit for that back-breaking endeavor. Eventually, all of the dirt piled up on the right was used to create the mound for the new slide and waterfall area.

Woah. What a mess!


This is a view outside the front door of the guest house looking up toward the back of the house. The mess is gone and flagstone has taken its place. You can close the back gate and really feel like you're in another world. Wow--that really was a lot of flagstone—called Wolf's Creek—that went into this backyard.  

Another view of the pool in progress and this isn't even the worst of the earliest before photos. We really built up the rear of the backyard to create the giant cement slide and waterfall. Was it all worth it? The squeals of excitement heard in the next little video clip reminds me that it was. Everyone is enjoying the finished pool and slide! For our family, this was a many-year project (I hate to say how many years it actually took), but thankfully—it's now a dream come true. 

Reading List: Books That Inspired This Journey

OK. I admit it. I get quite a bit of inspiration from walking through IKEA. And I found this book during my last trip to the giant furniture store. It's published by Ikea Family, and so Ikea does influence the style depicted in these rooms, but it doesn't dictate it.  A pictorial review of nine Swedish homes, this book is a treasure trove of ideas. What's wonderful about the Scandinavian farmhouse design it its lightness. Because sun is not as golden in Sweden as it is in California for most of the year, homes there must maximize the feeling of lightness, hence all the blonde woods and white furnishings that Ikea is known for. The design is also relaxed and makes such smart use of space with wonderful ideas for storage. After reading this book, we've started to carve out niches in the interior walls of our home. Not sure what we'll use them for just yet: cell phone charging station, wine bottles, boxes of tea. Who knows?

You can't design a farmhouse without going a little farther north to Ireland to get some tips. I love the sparsely decorated, open-air feeling created by the great rooms shown in this book. The concrete floors warmed up by plenty of wood notes and white walls really sold me on this look for our house. We'll be adapting a vanity cast from concrete that I found in this book for our own second bathroom.

This is one of my favorite books and may be the first inspiration for our remodel. Something about the truly enchanted artist colony in Carmel, Calif., and its characteristic fairy-tale style that really ignited my imagination. This book opened my eyes to the possibilities of creating a writer's retreat, a home that by its very design could fuel new ways of thinking about things. A writer myself, I loved the crooked chimneys, nooks, alcoves, libraries and writer lofts depicted in this book. My old traditional house style just seemed too square and boring after I looked at these timeless homes. My family made a road trip to Carmel after I read this book and had a wonderful time. I took plenty of photographs of actual Carmel homes by the sea to further fuel my fantasies of one day living in one in Los Angeles.
Ah, this book was also a very early inspiration and introduced me to some great fundamentals of design. In such a helpful way, the author prompts inquiries and reflections about how you want to feel in your space and then, elucidates you on how simple design elements—many inspired from Chinese and Ayurvedic design principles—can evoke feelings of peace, calm, movement, lively social engagement, balance, etc. I find myself returning to the images and tips in this book again and again, always reminding myself not to over-decorate or over-do anything. It expresses the beauty of simple, clean, organic spaces and timeless, natural building materials.

Believe it or not I bought this beautiful book at a car wash. After looking at these soothing outdoor living images, I couldn't put it down. Somehow the simplest things: a folded chair by the beach, an outdoor table lit by old hanging lanterns, a piece of wood mounted as a primitive shelf reminded me of how soothing rustic, natural elements can be.  In addition to the movie Under the Tuscan Sun, this book's promise of a relaxed, comfortable outdoor lifestyle inspired our entire backyard renovation. In fact, the decision to turn our blue liner pool into a stone pool was catalyzed entirely by this incredible cover photo. And I must admit, my latest obsession with gypsy wagons came from this book. I've spent many nights on Craig's list and Ebay trying to find an affordable one for sale!


I purchased this book when our renovation started to get more serious. It discusses the nuts-and-bolds of traditional building materials and methods used in Italy and has been a go-to resource time and time again. Floors, ceilings, furnishings, windows and doors are all covered in detail in this book. I was sold on finding reclaimed terra cotta tiles after looking at the ones shown in this book. 

Another great book on Italian design.

No country farmhouse design would be complete without some tips from architecture and interior and designer John Saladino. I learned of him after reading one of my favorite blogs: Velvet and Linen. And then, once I heard his name, I kept seeing it repeated elsewhere again and again. He is a master of relaxed, but classic design. Simple, yet elegant. Rustic, yet refined. All those juxtapositions are expressed seemingly effortlessly in his homes.

Reading this book forced me to straddle the two worlds of Italy and France. Each design style is similar, and yet--also different in many ways. My style borrows from both.

I must have about four of these quarterly Tuscan Style magazines. And while I see many of the images therein repeated online, I never tire of turning through these glossy pages again and again.