Monday, December 2, 2013

Dowel Christmas Tree Construction How-To

We've been so used to building things that we got a little crazy with our Christmas tree this year. Why not build one? Plus, we had a lot of scrap wood and paint around. Voila! Our Bohemian Christmas tree was born and will be helping us to celebrate the holidays in our New House. Pretty easy to build and all of the components come apart for easy storage.

Started with an 8 foot 4 x 4. Happened to have a few of those laying around the driveway! Then, we white-washed it with the leftover Benjamin Moore Linen White.

Starting 6 inches from the top of the 4 x 4, we started drilling holes at widths to match our wood dowels, which comprise the limbs of our tree. There are 14 of these holes drilled at every 45 degree angle, so that if you were looking down on this tree from the top, the formation would be a star. This is where most of the labor for this tree was spent. Drilling holes.

The base is composed of four 2-foot pieces of 4 x 4.  This picture shows the step before last, so the final has 4 legs. All screwed in with several very long screws.  This tree is pretty heavy so you don't want it tipping over.

We selected some wood dowels at home depot at varying diameters to give the effect of a real "tree," which has thicker limbs at the bottom, smaller, more narrow at the top. While other customers were walking out with traditional trees, our kids were hand-selecting dowels. At first, the idea of an abstract Christmas tree did not go over well with Zjena. But, when considered as a giant craft project, she got on board enthusiastically. Later, she and her friend white-washed the dowels to match our "trunk."

When the tree was standing upright, we started to add the "limbs." Did I mention before we ever considered attempting this, we crafted a smaller model using a paper towel dispenser and a bunch of chopsticks right after Thanksgiving dinner? Crazy? I know. But, it was the long holiday weekend and we had some time on our hands.

Here we go. Decorating the tree with dollar store ornaments (this must be the most inexpensive tree ever!)  in silver, white and gold. Our little helper was very busy.

Not bad for Dollar  Store. We may add white lights tonight. Not sure though. 


What do you think? 

Wednesday, October 16, 2013

Walled Courtyard Update: Getting Steps and a Planter

Here's an update on our walled courtyard, which is coming along nicely. Here is a shot of the landing steps. This will really be the main entry of our home now. I asked for steps that were deep enough that I could get a stroller down them, but I realize we won't be needing a stroller for much longer! Max turns 2 next month.

Here's the concrete base going on the wall. The Vasari stucco in the salmon tone will go over this once the surface is nice and smooth. 

Notice the new stacked stone planter in front of the wall. I was afraid the wall was too big and bland and a planter helped to visually break up the space. I'll put lavender in there as soon as the wall is finished and our old wooden bench in front of it. That long planter required a lot of stone! But we cleaned up much of the front yard debris by using it and got rid of extra dirt by making a planter. The rest of our stone will be used on the front entry steps and to make a winding path leading to the sidewalk.

Ah, a view down at the second step of our new front entry. Can't wait to come in and out this door. So much easier.

This is what you see when you enter the old wood gate. The flagstone and pea gravel patio is nearly finished. We opted to go with the gravel because it allowed water drainage and it was far cheaper than cementing everything in. This should make a nice outdoor room. What do you think?

Monday, October 7, 2013

Another Brick in the Wall (Sneak Peek)

This week we're finishing our walled-in front courtyard and I wanted to share some pics. Here is a shot of the "French Wheel" that we turned into a window with brick detail. Surprisingly, the inside of this courtyard is quite large. Just off our living room/great room area, this outdoor room makes us feel like we just doubled our living space. Our whole family is loving our house now. We LOVE it and never want to leave. We feel very grateful and blessed to be enjoying the rewards of all this hard work.

And here's a shot of our old world doors with speak easy. These have been sitting in our backyard for more than two years! So excited we are finally getting to use them. They actually came off of an old Bavarian restaurant in New Jersey. But they are lending the "Carmel" storybook feel that we love so much. Can't wait to decorate this wall for Halloween. Those pillars on each side of the doors will be covered with stone. The right side will have an outdoor iron lantern.

Here's a look inside as the wall was just going up. We do like our neighbors, but also will enjoy a little bit of privacy, especially in the morning. With those big glass doors on the front of our house, we were feeling a little exposed especially since we haven't gotten around to installing window treatments yet.

They just got the second door hung before I left for work. Notice the old reclaimed brick detail along the top edge. This entire wall will be stucco'd with the salmon color to match the house on the outside. While the inside of the courtyard will be Vineto Fieldledge stone. A few cypress trees and iceberg roses, rough stone front steps and a flagstone front yard with grape stake fence and we're just about done! Stay tuned!

Tuesday, September 24, 2013

Concourse D'Elegance and More Landscaping Inspiration

We are working on our stone courtyard patio and I've been going through my inspiration files (yet again).  Came across these from the Concourse d'Elegance, a vintage car show at the Greystone Mansion in Los Angeles. 

While Milo was looking at the cars, I was snapping pics of the beautiful grounds, which are amazing.

Of course, the Greystone Mansion boasts some sprawling lawns. But, it's the pretty combinations of plants that caught my eye: the Italian cypress trees and lavender, for example. So pretty framing this walkway. Think I'll be borrowing this idea.

Other people were taking photos of the cars, but I was more fascinated by the flagstone with gravel and brick detail.

Certain plants do having stopping power with me: Like this rosemary hedge planted in front of a house near our gym. I spied it one day while walking with the kids. I must have a pic of this, I thought.

I was afraid that the owner would see me stalking her house. But, the rosemary was so pretty and well, genius. I have since borrowed the landscaping idea for the parkway shown here. We have rosemary and lavender planted in that plot between the street and the sidewalk. Ours is covered with pea gravel though.

Ah, back to our house. I'm borrowing some plants in this shot from our neighbor's yard. I do like this plumbago.

And we already have some iceberg roses. We won't need to buy anything new for our yard--we'll just need to move things around. Amen to that.

And did I mention that our neighbors, who own Level Line Construction in West Los Angeles, dropped off some flagstone from one of their jobs. We saved them some hauling fees, and they saved us a lot of money buying flagstone.

Only one small problem: The flagstone we already have, called Wolf's Creek, is everywhere. From our front steps to the pool in the backyard. Wolf's Creek is darker with richer burgundy tones, browns and deeper grays. The new stuff is very light. And yet, did I mention it's FREE? Ah, such a conundrum. My frugal side is conflicting with my aesthetic side again. We'll have to find a creative solution that may involve some concrete stains.

More front courtyard inspiration. Love this pea gravel.

This feels like a fortress. The stone textures mingled with green plants and the flowers are amazing.

Oh, how I would love room for a fountain. Don't think that's in the budget though.

I love the color of these walls with the rich patina and the brick arch detail. We have some old arched doors with chunky hand-forged metals strap hinges going in the front of our house. Would love to figure out how to create an arch like this.


Here's our starting point. Our walls won't be too tall--they should reach the height of the top lite on the arched French doors though. We'll place the pale flagstone, blended with some Wolf's Creek, into the gravel to create our patio floor. I've ear marked a few giant flagstone pieces for the front entry steps. Stay tuned for an update. This should be going in this week so I'll post the after pic as soon as they are available. Fingers crossed we've made the right decision with the walled courtyard. What do you think?


Wednesday, September 18, 2013

The Kids' Bathroom: A Quick Update and More

Getting so close to finishing our house now! The kid's bathroom is just a few steps away from final. Thought you might like to take a look. Everything works. The carved mirrors still need to get hung though. This bathroom will function for guests, especially those using our pool, so it's not decorated with the usual primary colors and kid stuff. We're going for timeless, rustic, organic. My daughter, who is mermaid-obsessed, likes the shell with the heart carved into the tops of the mirrors. So, that was enough to win her over. And she LOVES her new bathroom.

Just another view. And if you look in the mirror ...yup, that's me with Max. I had to stand in the kid's water closet to take this picture.

Yet another angle. I wanted to get more of the chandelier in the shot and show off some of the high ceilings with the white washed cedar planks.

Here's a reminder of my early sketch. We ended up cutting up our kitchen island instead of our table, so no cabriolet legs on the vanity like the ones I drew in this sketch. (So glad we didn't chop up our dining room table.) And we haven't built in that side closet just yet or placed any upper shelves. What do you think? Did we sort of come close to the early plan so far?

Ah, an earlier phase. The vanity standing on its side. At this point, I feared I did the wrong thing by asking to have the kitchen island sliced right in half. 

Here is a shot showing a peek of the French pocket doors into Max's bedroom. And you can see a little more of those French pavers cleaned and sealed.  A wire basket holds pool towels. And there's a wooden step stool for Max, who already fell off of it twice!

And I couldn't resist showing off our new hardwood floors, the DuChateau wide plank European Oak in natural finish. Right now, this great room space is pretty wide open, so we have dance parties with the kids and we even brought out the gymnastics mat for cartwheel and handstand practice. Do we really need furniture?

Wednesday, September 4, 2013

Hall Closet: A Little Bit More Finished

The hall closet is a little bit more finished. These baskets will mainly hold linens, dirty laundry and laundry soaps. 

The doorway to the right is the new entrance to the master bedroom. Same general location, but arched and plastered with a reclaimed oak door and brass door knob. (It came with the old doors we found on Craig's list. At first, we thought we'd switch the brass knobs out, but the color looks surprisingly good so we're keeping them.)

Take a look at the basket on the top shelf. This is actually the laundry hamper for the upper loft. There's a little opening up top to shoot down dirty laundry and for small children to crawl though. (Yup, they do it all the time.) While I couldn't squeeze it into the pic, there is also a chandelier in the vaulted part of the hallway ceiling. Pretty at night, but you never need to turn on any lights during the day. Not the case with the old dark hallway.

Just a reminder what the old hallway used to look like. And this wasn't the real old hallway before we took the ceiling out and roof off. But the white doors shown here will give you the gist. We removed these old closet doors, stripped them and are turning them into a built in bookcase.

There will be a simple linen skirt here to hide the other laundry basket in the bottom.  I'll post that after it's installed. Hardwood floors in the main living room and dining room open/floor plan are getting finished this week as I write this.  And the concrete floors get a better polish tomorrow. Very exciting! I'll share those pics soon.
Have a great week!

Monday, August 26, 2013

Landscape, Lifestyle and Joie de vivre

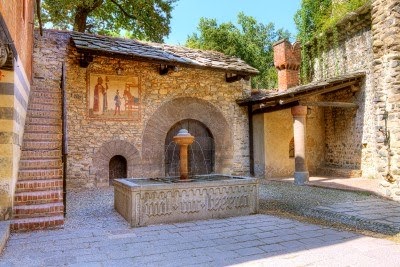
 Ah, August is nearly over, but I'm not ready to let go of summer. We're so close to finishing the inside of our house, I'm already dreaming about the outside. Thought I'd share some inspirational pics of landscaping that is just so beautiful. Love the broken concrete and gravel and all the lush vines growing up and around this patio.

 We're definitely going with gravel. No need to mow it and it still allows for yard drainage. You do have to be diligent about keeping the weeds out though. 

 Such a lovely outdoor eating area. The lush vegetation is tempting.

 Glass of wine anyone? That striped table cloth adds a nice punch of color.

 This little seating area is so inviting, don't you think? Grab a pillow, a book and a glass of lemonade. With regard to landscaping our front yard, our challenges will be creating a sense of privacy with an outdoor patio, that is, with a stone or stucco wall, but one that's not too high or too obtrusive as to make you feel disconnected from the neighborhood. 

Like Provence, Carmel is another inspiration for landscaping. We plan to have a grape stake fence. It lends a note of whimsical fairytale to our Euro farmhouse feel.

 This winding walkway pulls you right in. We must have one of these two. Although I don't think I could care for this many plants even though I love how they look here.