Monday, April 29, 2013

Progress Report: We've Been Busy!

Thought we were due for a progress report. We have been busy on Purdue Avenue these days! I thought I'd start with one of my inspiration photos for the exterior of our house. I actually taped this image onto our wall to help us try to replicate the color combinations. I knew our house would have a similar salmon hue and I just love the dark color of these shutters against the old brick. And then, of course, I loved the pop of colors from the flowers on this balcony railing. I've been chomping at the bit to get some flowers for the front of our house, perhaps in a nice little window box under our bedroom window. And some day, we'll try to replicate these deep chocolate shutters, too. 
It happened that I went shopping and saw these beautiful hanging vine geraniums. In my experience, these plants are super tough and that's just what I need at our house. Everything has to be extra tough to stand up to the elements, lack of watering and kids.

We're not ready to install any window boxes just yet. We've got plenty of other bigger fish to fry. But, I couldn't resist hanging one lone pot of these geraniums on a nearby tree just to see how the color looked and—voila. That red pops nicely, don't you think? While I don't have those deep dark shutters yet, I do have some kona colored drain pipes. (And we're painting the rest of the house windows with the same exact color.) I have to say I do love the red pop against this house. 

Here's a look at how the kona color is looking. These windows are in the back of our house, facing the garage. The white is just primer. Notice the kona colored drain pipes. (And please disregard that box in the shot, which actually holds a very pretty new toilet.) 

Here are the windows painted with the kona color. We painted all of the south and west facing windows this past week. I hope we did the right thing. We thought of using a gray, a cream and even a blue-green here. But, we weren't sure what would work with the multi colors of the stone. We opted for a little bit more dramatic punch of color. And by using the kona, which is already used on different accents of the house, we weren't introducing yet another color into our palette. The roof is already multi-colored, too. What do you think?

We've also been working on the kid's bathroom. We put another layer of cement into the shower/tub combo. The electrician finalized the wiring for the hot water heater control panel. And we started dry-walling everything. You'll also notice the nice arched opening to the water closet; this is where some nice oak french doors will go. 
Here's another shot of the kids's shower. We had a little bit more of the French pavers, so we made one small step to help the kids and guests get into this giant tub area. It turned out to far bigger than I had imagined it would be. It's going to take a lot of water to fill this baby up, but that's OK. With the sun streaming in, it will be lovely to take a bath or shower in here. 
Here's a close up of the step. That alcove opposite on the stone wall inside will house the waterfall faucet. 


As I mentioned, we painted all of the driveway windows with the kona color. Even those two windows way up top by the chimney. I'm hoping the color grows on me. Until we get the final lime-wash on the exterior stone, I'm not sure if it's feeling exactly right. It's getting there though.
We also mounted those nine foot arched oak French doors I had mentioned. We had those straps specially made, but now we're thinking we should have screwed them into the side of the door, not the front. They would be far less obtrusive in this way and just as functional. But we won't be making new straps for awhile, so we'll have to live with this for now. I have to say these doors, despite how heavy they are, glide like silk on the barn door hardware. Such an improvement over the doors that used to be here!

We've recently been busy stripping all of the old oak doors (we found on Craig's list). They were painted white with brass hardware. They are really beautiful now that the paint has been removed. 

Here is a shot of the door after it's been stripped. The white washed tones of the oak are going to look great with our neutral color palette. These doors will be used for the master bathroom, and then, we'll convert two of them into French doors (cutting them in half and opening with two sides) for the master bedroom and the kid's water closet. We have to do the French door style in order to make them fit. Fingers crossed it works.
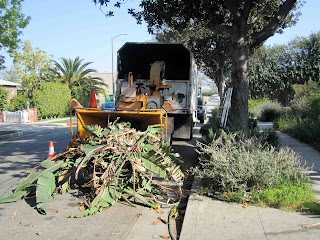
We've also been busy doing some desperately needed tree-trimming. We had to bring in the big guns to trim this bird of paradise though. It was so overgrown, we couldn't see out our bedroom window anymore. And while we like having this mature plant provide us some privacy, we also like sunlight. We considered cutting it down entirely, but alas, we didn't have the heart to do it. I confess, my husband and I have a serious tree hugging side. 
Here's an early shot of the cut stalks from the bird of paradise. It was amazing how much we could cut. About five guys worked on this and finished it in about 15 minutes. They were pretty amazing. If Milo attempted this on his own, it would have taken about three weekends and probably 10 green bins to get rid of all of the green debris! Sorry that I don't have the final after photo. I'll post one soon. 

Here's another project that's been keeping us busy these past two weeks--a renovation of our elementary school's pre-K yard. Our daughter goes to Richland Avenue Elementary and I recently volunteered to help organize a "refreshment" of the yard as part of our school beautification. So, this is what's been keeping us busy on weekends--although thankfully, I've got lots of help from other dedicated Richland families and neighbors here. This original mural, which got a paint refresher (and it's not quite finished yet), was so cute that it had to stay--and it's helped us to establish a "farm yard" theme for the rest of our pre-k space. We put in a new vegetable garden, potted plants and have been busily painting away on Saturdays and Sundays while the kids play. It's actually been a blast. I'll post our after pics soon, so stay tuned!


Wednesday, April 10, 2013

The Beauty of Barn Doors (Progress Report)

Since the theme of our home reno is "French Farmhouse," it wouldn't be complete without a few barn doors thrown in. And this week, we're making some real progress on getting our doors mounted on the tracks and made fully functional. I get really excited when I come home at lunchtime to see all of the progress. Here's a look at some of the doors that inspired us--as well as the doors we've hung this week so far.
Yup, these look like barn doors. Love the X configuration.

Look at this great old door, which encloses a storage pantry. And the chalkboard paint on a kitchen wall is pretty awesome, too. The kids would love that.

Clean, modern: Meet rustic wood.

A close up of the actual hardware. This rolling hardware can get expensive, but we found a pretty cheap alternative online, from an agricultural supply store. Our hardware was nearly a third of the price of most.

Another close up shot of the barn door mechanism. Looks easy to install, but it was a little bit tricky. In fact, notice how the hardware is installed just a few inches from the edge. We made the mistake of installing ours flush with the edge, which left a gap when the doors came together. Oops. They fixed that though.

Here is our open floor plan great room and these doors, purchased from Pasadena Architectural Salvage a year ago,  will open into our son's new bedroom. Door handles to come.

A close up shot of these doors. I just love the distressed look of these doors.

These are doors removed from a wardrobe. I loved the color of these, too. They were intended for a built-in closet, but they turned out to be too big for the space. But, they work here, don't you think?

I'm getting a feel for the space now, but really do hope the cedar and additional 4x4 beams that we'll add to the ceiling will warm up this space and take off some of its cold industrial vibe. That's a lot of metal and stone right now. But I'm loving this wide open space with the loft peeking out up top. I feel a dance party coming on. Imagine a wood loft ladder right between these doors. And a sparkly chandelier in that cut out space in the upper right. We made this cut-out to enhance the light in our dark hallway below. It's already working! Yeah.

Here's my mad-scientist/contractor/baby-sitter/problem-solver extraordinaire husband. (Did I mention we had a baby just after our home renovation began? What were we thinking?!) He's 6'4", so you know these arched doors are pretty tall. They will also be mounted on barn door hardware, but they'll have to be custom-made. These are the nine foot oak doors that weigh about 200 pounds each. We purchased the set of two for $100 from a designer in Ojai, Calif., two years ago. I told her I'd send her pics of the doors when we finally got around to hanging them. Wonder if she'll remember us? 

This pic shows the inspiration for our oak doors above. When I saw these arched doors hung as a barn door I knew I had to find a way to get this look. I think our oak doors come pretty close, although ours won't be blue--they will be white washed with the same Benjamin Moore White linen color we'll lightly rag on the cedar ceiling planks. 

Our crew stripped these doors. They were blue previously. I love the striations in the oak seen here. I thought the white washing was the way to go because it showcased the wood's interesting texture while tying into the light and neutral color palette of the rest of the great room. What do you think? Fingers crossed we made the right decision. I always feel I won't be totally sure until everything is complete. And then, my husband will want to kill me if I suggest some changes.

 Here's a shot of the dry wall going in. And a look at where the barn door track will go for those gargantuan arched doors. Since these doors are so heavy, they'll need to be mounted on plywood not directly onto the drywall. The brick arch will eventually be lime-washed to make the red tones a dustier, rosy hue. I have a blue chandelier waiting to go in just above a long farmhouse table in front of these doors. Can't wait to see that. I'm thinking the blue of the chandelier will pop against those white washed oak doors. We'll see. Stay tuned. I'll be sure to share pics of the final.

Tuesday, April 2, 2013

Our Bedroom Window: Then and Now

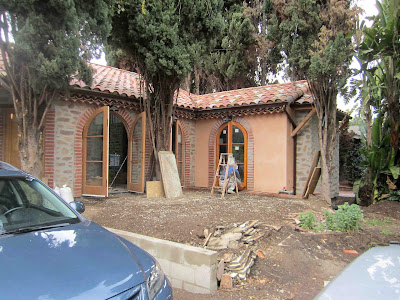
We added another wood casement window last week. It was one of those last-minute decisions and it put us back one week in our timeline for completion. After we installed this French door, replacing an old window on this south side of our bedroom, we discovered that our bedroom still felt a little bit dark. We wanted a little bit more light from the south and this little window does the trick. We installed it high up though so we don't really need a window treatment. It will also allow in a breeze at night. 


I went back through some old photos. I know I've posted some of these before--like this one above of the early stages of our remodel. But some I haven't. The next pics really do capture the amount of work that went into this renovation. I'm actually amazed at how much we've accomplished.

Digging the foundation for the small addition that would enclose our old porch.

The frame for the concrete to be poured.

We lived like this for awhile. 

I started to get excited when all of the front doors went in.

Then, the new bedroom alcove and window. No more bay window, but we gained a few feet of space so we could push our bed into this alcove.

The front bedroom window going in.

Then, of course, let's not forget the new roof.

Putting the tiles on the new roof.

Finishing the tiles. Then, adding the black paper.

Another view of the black paper.

Let's not forget the lathing--that's all the wire that will hold the scratch coat of cement.

Then, the scratch coat.

Then, the brick arches.

Then, the salmon stucco. I wanted to come close to the color of the old house. I always loved this pink hue. Seemed an appropriate color for a girl with my last name.

We also had to build up the berm. Notice the block wall that was added in the foreground. We'll eventually have walls here to enclose a front patio and give us a little bit of privacy. It will make a nice outdoor room and function almost like a courtyard so that we can walk from the bedroom to the living room via the outdoors.

This is the point where I started to wonder if we needed more light in our bedroom. Somehow it wasn't as bright as I had hoped. Then the idea struck us: Put in one more window! Could we squeeze one in? Sure, why not?

I deliberated this decision, especially because it was another cha-ching, cost-wise. But, we had the window. (We took it from our walk-in closet.) And it only took a few days to frame it in. It was now or never.

Now let's recap: Here's a little reminder of the "before" bedroom window. Not a lot of light here. 

And here's the latest after again: at least so far. This window got another coat of a special stain yesterday to match the door nearly exactly. A pic of the real final will be coming soon. What do you think? This little window is giving the house more of a Carmel cottage vibe to me now. But I've always loved those Carmel houses, so that's OK by me. I guess this is a Provence-Tuscan-Carmel-themed home. Stay tuned. In addition to finishing this window, our crew put stone above our fireplace all the way to the ceiling. We also selected the type of wood and color of our ceiling planks: red cedar with Benjamin Moore White Linen white wash. More on that later. The plumber came and completed some hook-ups and remedied a problem in the kid's bathroom. And finally, Milo has been busy finalizing the barn door hardware, so we may have pics of those doors finally going in this week!